
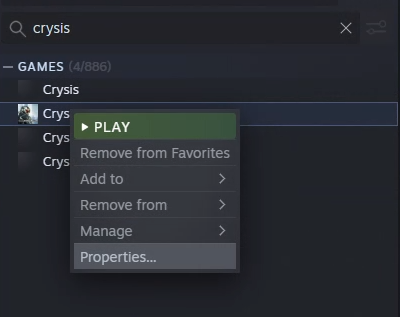
I originally posted to the r/steam_link subreddit, so I’m putting it here as well!
Hey all, I decided to compile a few frequently asked questions/instructions here so that it’s easier to find and point people to. There are many different ways to accomplish what I am going to describe here, this is just the most basic, manual method of getting things set up.
Adding Non Steam Games/Programs to Steam
In order to stream games and programs not from the steam store via Steam Link, it is best to add them to steam as Non-Steam games for full functionality

For non-DRM games or emulators, you can add these games directly from this window.
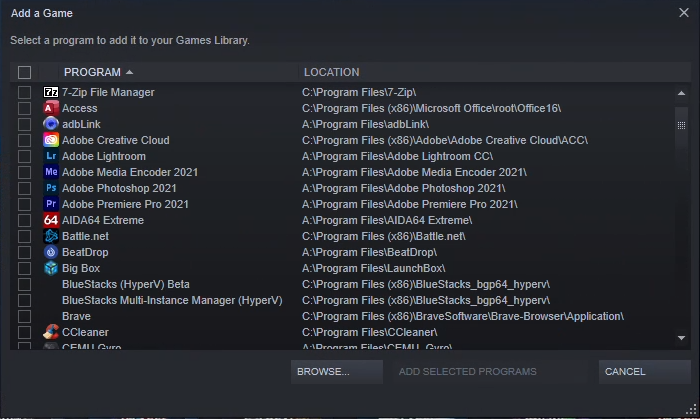
But if you want to have separate controller configurations for each emulated game, you should follow the instructions later in the guide to add each emulated game instead of the emulator itself.
If you’re adding a game from another launcher/store(Epic, Origin, Uplay) with DRM (which most games have, except those from GOG), you’ll need to use one of two programs to coordinate opening the launcher, starting the game, and getting steam to hook into the game process instead of the launcher, then closing the launcher when it’s no longer needed. There are 2 programs that I recommend to accomplish this, they are OSOL and GloSC.
OSOL & GLoSC
These programs handle the coordination in different ways, and I recommend each for different things. While OSOL opens the launcher, launches the game, focuses steam on the game process, and then closes the launcher when the game process exits, GloSC opens the game normally but instead of Steam hooking into the game process directly, it hooks into a transparent window created by GloSC.
For Origin, Epic, Uplay, and Battle.net games I recommend using OSOL since it tends to perform the best in cases when the process can be hooked into. For Windows Store games I recommend GloSC since UWP apps cannot be hooked into, so OSOL will not work. In addition, there are a few cases where games will prevent processes from hooking into them (rejecting the Steam Overlay, and thereby Steam Input) so GloSC is the only alternative in these cases as well.
Configuring OSOL
OSOL can be downloaded from https://github.com/WombatFromHell/OriginSteamOverlayLauncher/releases, where the releases are packaged as .zip files. Once unpacked the only file of importance is the OriginSteamOverlayLauncher.exe file, which is both used to configure OSOL and to run OSOL itself. When first run, you will be asked to choose the path to your game executable

and then asked to choose the path to the launcher executable.

Selecting the game and launcher executables will generate a .ini file containing the configuration for that instance of OSOL, so if you select the wrong files or mess up, don’t worry! You can still change the configuration directly from the ini file, which looks like this:
[Paths]
GamePath= | Path to the game executable
LauncherPath= | Path to the launcher executable
LauncherArgs= | Arguments to pass to the launcher
LauncherURI= | URI to pass to the launcher (rather than launching via a game executable, Epic uses these to launch the game)
GameArgs= | Arguments to pass to the game
MonitorPath= | Path to the executable that should be hooked into and monitored to determine when the game is closed
PreLaunchExecPath= | Path to an executable to be launched before the game or launcher is opened
PreLaunchExecArgs= | Arguments to pass to the pre game executable
PostGameExecPath= | Path to an executable to be launched after the game or launcher is closed
PostGameExecArgs= | Arguments to pass to the post game executable
[Options]
ReLaunch=True | Whether to attempt to re-launch the launcher when started
SkipLauncher=False | Whether to skip opening the launcher
CloseLauncher=True | Whether to close the launcher when the game exits
AutoGameLaunch=True | Whether to automatically launch the game
MinimizeLauncher=False | Whether to attempt to force the launcher to minimize
ElevateExternals=False | Whether to run the pre/post executables as admin if OSOL is run as admin
PreGameLauncherWaitTime=15 | How long to wait after the launcher has been detected
PreGameWaitTime=0 | How long to wait before launching the game
PostGameWaitTime=0 | How long to wait after launching the game
ProcessAcquisitionTimeout=120 | How long to wait for the game/monitored process to be detected
InterProcessAcquisitionTimeout=15 | How long to wait when attempting to re-aquire the game/monitored process
GameProcessAffinity= | Core affinity
GameProcessPriority=Normal | Priority of the game process
[Info]
ReleaseVersion=1.0.9.8
Of these options, you’ll mostly use the Game and Launcher Paths, the Launcher Args and URI, and on occasion the MonitorPath. Rather than re-write everything already in the OSOL wiki, I’ll point you to it instead: https://github.com/WombatFromHell/OriginSteamOverlayLauncher/wiki
Finally, to add the game to steam, add the OriginSteamOverlayLauncher.exe to Steam, then rename it to the game name from the shortcut properties.

Configuring GloSC
GloSC is quite a bit easier to set up. You can download the installer from https://github.com/Alia5/GloSC/releases, which will install the GloSC program which manages all games added via GloSC.

In order to use it, simply launch the program, click create and enter the information for the game.
Usually you will want to have “Launch Game” and “Close shortcut when launched Application Closes”, but it depends on what you’re trying to launch. You can either enter the path by typing, by clicking the three dots […], or by clicking the UWP button to add a UWP game.
Often the UWP app list is incomplete, so you will need to enter the path manually. The easiest way to get the path of a UWP app is to make a shortcut to the app on your desktop (right click it and add it to your start menu, then drag it to your desktop) and then open the properties for the shortcut.
Often the path will be longer than the preferences window, so you can drag the shortcut into notepad to view the whole path. There will be spaces between every character, so just replace the spaces with nothing to make it easier to read .
The path will always end with “!Something”, and often the “Something” is “App” or “Game” which makes it easier to find the path in the file.
Now that you have the path for the UWP app, just put that into OSOL as the path and click save to create the shortcut.
Once you’ve added all the GloSC shortcuts you want, you can add all of them to steam using the “Add all to Steam button” but be careful since this will close Steam.
Emulators
While you can add most emulators directly to Steam as Non-Steam games, adding the games themselves allows you to have separate controller configurations for each emulated game, and to seamlessly load an emulated game alongside the PC games in your collection. Generally you add the emulator as a non steam game, then go into the properties for the shortcut and add the path to the Rom File.
Some emulators need additional flags before or after the ROM File, and I’ll give some example configurations below:
Yuzu/Citra/PPSSPP/ReDream/RPCS3/Xenia: “Path to emulator executable” “Path To Rom File”
Dolphin: “Path to Dolphin executable” -b -e “path to ROM file”
CEMU: “Path to CEMU executable” -f -g “path to ROM file”
PCSX2: “Path to PCSX2 executable” “Path To Rom File” --nogui --fullscreen
Retroarch: "path to retroarch executable" -L cores\emulator core .dll file "path to rom file"
ePSXe: "path to ePSXe exectuable" -nogui -loadbin "path to rom file”
DRM Free (GOG, Twitch Gaming)
This one is easy. If your game has No DRM, just add it as a non-Steam game directly. That’s it!
I don’t seem to be able to make the original post any longer, so I’ll continue it here:
SteamGridDB
https://www.steamgriddb.com/ has a great database of Steam Library images to make the non-steam games look just like the native steam ones. They have images for both the normal library view (600x900 pixels) and for the Big Picture mode view (460x215 pixels).
To import the images into the normal library, you can download the image from steamgriddb, then right click on the non-steam game and select Manage -> Add custom artwork and navigate to the downloaded image.

To add the images to the Big Picture Mode library view, you need to select the game in Big Picture mode, then select “change icon” and navigate to the downloaded image.
Supported Controllers
Steam has a list of supported controllers for each type of the software, and while it is by no means comprehensive (I often use 8BitDo controllers on my Android app, which aren’t on the list), It’s a pretty good place to check for a definitive answer of what does work.
OG Steam Link Hardware: https://support.steampowered.com/kb_article.php?ref=9221-RTID-4643
Steam Link Android App: https://support.steampowered.com/kb_article.php?ref=4415-USKX-8715
Steam Link iOS App: https://support.steampowered.com/kb_article.php?ref=4594-QEPA-1451
Steam Link Samsung TV App: https://support.steampowered.com/kb_article.php?ref=5613-TADC-2802
Steam Link Raspberry Pi App: https://support.steampowered.com/kb_article.php?ref=6153-IFGH-6589
More Advanced Stuff
Run Steam as Admin
If you don’t launch steam at startup just right click steam and choose launch as admin. If you want Steam to launch at boot as admin, you need to set that up in task scheduler.
Open Task Scheduler and create a task called “Start Steam” that runs when user is logged on. Make sure to check “Run with highest privileges” in the general tab, since that’s the whole reason we are doing this.

Next go to the Triggers tab
and create a trigger that begins “At log on” for “Any User”.
Now move to the Actions Tab
and create a new Action in the Actions tab that launches the steam.exe.
That should be all you need to do to set steam to launch at boot as Admin.
Launching games/stuff with bat scripts
This is probably the most advanced you can get. OSOL can launch .bat scripts which can really do anything, launch anything, or change anything. In [This Guide]( https://www.reddit.com/r/PhantasyStarOnline2/comments/gsjicf/a_guide_a_wrote_up_for_playing_pso2_on_steam_link/) I explained how to write a script that would change the UACLevel (generally a bad Idea, just for reference), but you could also use it to start a VPN connection so that you can use Xbox In-Home Streaming remotely, launch and focus a troublesome app like PlaystationNOW, or hundreds of other things. There is so much you can do that I can’t go through everything here, but I’ll include an example of the one I used for PlaystationNow when I was subscribed to it. I am no longer subscribed and the app may have changed so I can’t vouch for it’s functionality, but it gives you a general idea of what you can do with these scripts.
PreExec.bat
This script launches Glosc with a blank target and launches ViGem PS4 to emulate a PS4 controller.
u/echo off
Start "" "C:\Program Files\GloSC\SteamTarget.exe" "C:\Program Files\GloSC\targets\blank.ini"
"A:\Program Files\ViGem PS4\VDX_x64.exe"
Exit
PostExec.bat
This script kills the psnow launcher and ViGem PS4
u/echo off
taskkill /IM psnowlauncher.exe /F
taskkill /IM VDX_x64.exe /F
exit
I hope that this info has been helpful. I try to answer questions in this community as much as I can, so I’ll be around!