

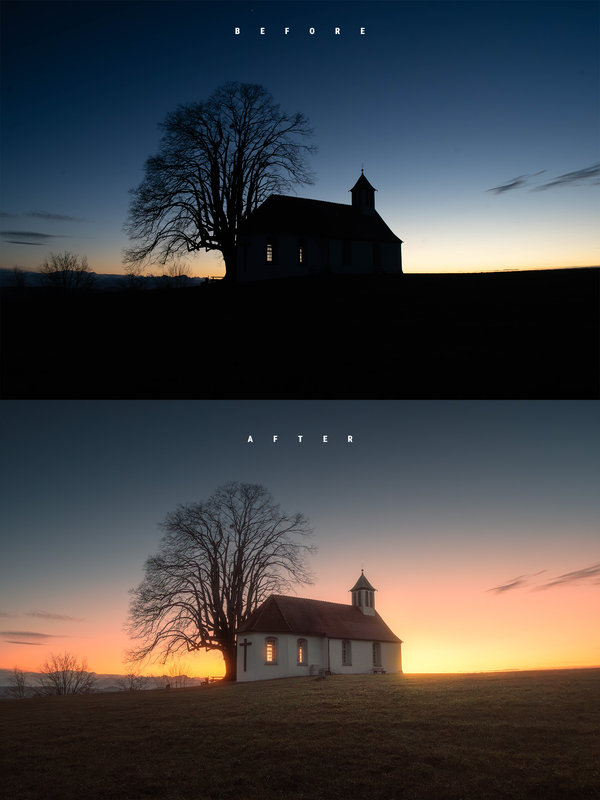
I want to share another heavy Lightroom Edit. The initial plan was to combine different exposure for an HDR, but just for fun I wanted to see how much I can restore from a single exposure and this is the result of it :-)
Yes, this whole scene is “unnatural” after the edit, the light of the foreground doesn’t make much sense and the glow is exaggerated. But for me the goal of the editing part isn’t to keep it natural but to have fun with the tools we can use. I’m happy with the outcome here!
The whole editing can be seen in the video here, with raw file to follow along:
https://youtu.be/TsdTCGNfIYI
1. Basic Adjustments
To restore the underexposure, I heavily raised exposure, shadows and blacks. This results in some blown out highlights in the sky so I brought them down to counter that. This led to heavy noise but Lightrooms AI denoise got rid of it easily!
I also made the white balance warmer for the sunset colors, added more vibrance then dropped clarity and dehaze to add subtle glow on top.
2. Masking
Using a linear gradient I targeted the foreground to make it warmer and give it more structure. By intersecting a radial gradient with an object selection mask I created the light spot in the grass right in front of the chapel by raising whites and exposure.
Multiple modified sky masks were used (I always subtracted the darker, cold part of the sky) to add mor warmth and some more brightness behind the chapel (increasing exposure, blacks, whites and also the white balance temperature).
For extra glow and (intentional) overexposure, I used a small radial gradient overlapping the sky + the bottom right corner of the building and further brought up whites, blacks and white balance temperature.
I also didn’t like the colors of the building, they were too cold for my taste so using an objects selection mask I targeted the chapel, then increased white balance temperature!
Then, to give the scene some more contrast I used a linear gradient to make the sky darker by dropping the exposure.
3. Color Grading
First, the hue of the yellow tones were dropped, giving the brighter parts of the sky more orange tones. At the same time I brought down the yellow saturation a bit to keep a nice balance here.
Finally, I used split toning to add strong warm color to the highlights and a subtle cold blue tone to the shadows for a bit of color contrast.
I think it looks really good!
@Blaze Personally I prefer the more natural or real photos, in this case I’ll stick with the first one above, more silhouette of the building with the sky in contrast and less HDR